


Enter keyword(s) to search Blogs
Click here to be taken to the original blog
Most Recent
Categories
An old theatre prop in the form of a tree greets you as you enter the back door of the Set Design Studio at Mendocino
College in Ukiah, CA. The back side sports black marker lines for a jigsaw to cut out the leaves and branches, and a
metal frame is welded together to provide support. Functional. But Steve Decker, CVPA Technical Director and instructor
of Technical Theatre and Design, had plans for how to update the skills that could be taught through the theatre program
at Mendocino College. As part of his hiring contract, he requested a ShopBot CNC router with vacuum hold down and a
new welding set-up. The funds for purchasing the equipment came in the form of a Workforce Development grant from the
State of California. With the purchase made, Sallye Coyle headed to Ukiah in December, while students were on winter
break, to install and train people on the use of the new CNC.
The first order of business was to get the ShopBot PRSalpha 5’ x 8’ built and the vacuum hold-down system prepared.
The system that they have on their tool uses a Becker Rotary vacuum pump that will pull a vacuum through the top
layer of bleeder board (MDF) to hold down a large sheet of material. The Becker is a heavy critter, and so it helped that
Steve and Sallye had planned ahead to know where it would sit under the ShopBot table, and what equipment would help
get it out of the crate and into position. Steve had a lift jack to move the Becker crate, and a forklift with chains ready to go
when the table was partially built and in the approximate final location.
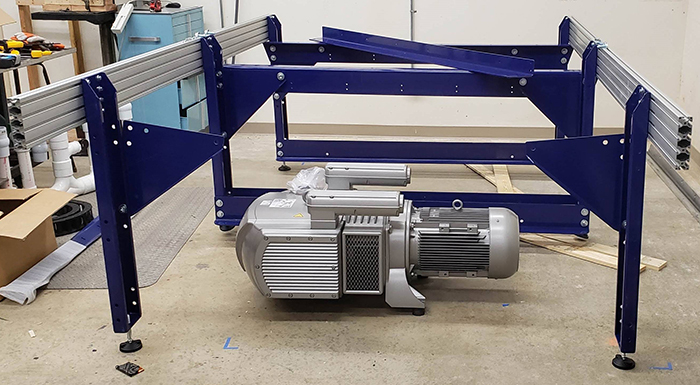
The Becker pump in place under the second “bay” of the ShopBot table. Hot air exhaust will blow away from the operator and avoid heating up the
ShopBot Control Box, which will sit at the far right hand side in this photo. The operator will stand at the far left side. Note the ring on the top right
side of the Becker pump (one of two) that helps to lift the pump into position.

The ShopBot CNC in its final position, with the Becker Pump shut off box mounted on the ShopBot table leg near operator. The VFD for controlling
the spindle is also mounted on the side of the table near where the operator will be. The ShopBot Control Box is mounted on the far side of the table,
away from the operator. As a reminder, the computer station is positioned at the “Front” of the ShopBot (the long rails are the X-axis), and the spindle
moves along the gantry in the Y-axis. The plumbing for the vacuum hold-down system is not yet in place.
Vacuum and other kinds of hold-down are worthy of a blog of their own, so this blog will concentrate on the types of files
that Steve and Dave, faculty members of the theatre program, worked on during training.
For every training, Sallye likes to demonstrate the three major categories of toolpath options, and the bits that are related
to those toolpaths.
MACHINING TO ONE DEPTH: FLAT END MILL BITS
Profile (inside, outside, or on the design line or vector), pocket, and drill toolpaths are toolpaths where the bit plunges to
depth, then stays at that depth for the entire operation or pass. Flat end mill bits like the .” down spiral, .” up spiral, and
.” and ó” straight bits that are found in the ShopBot starter bit kit are the bits used for those types of toolpaths.
While Steve was familiar with running a CNC machine, and engineering design software such as Fusion 360, his coworker,
Dave, is a painter and artist, and was a bit dubious about the skills needed to design a file, choose a bit and
toolpathing option, and cut out a part. So, his “homework” one evening was to draw something on paper, then scan it and
save it on a thumb drive. Since a scanned object is a bitmap rather than a vector, we imported the scan into VCarve Pro,
and used the trace function to find the edges of the spider he had drawn. With a few other tools in VCarve, we cleaned up
the new vectors, then created a profile toolpath to cut out the spider with an end mill bit. Each opportunity to actually cut
something out is an opportunity to go through the steps for setting up the ShopBot for machining, so Dave ran through the
check list to be sure that everything was ready to start a file: correct bit in place, ShopBot zeroed out in the X and Y axes,
z-zeroed using the Z-Zero plate on top of the material, spindle power on, etc.
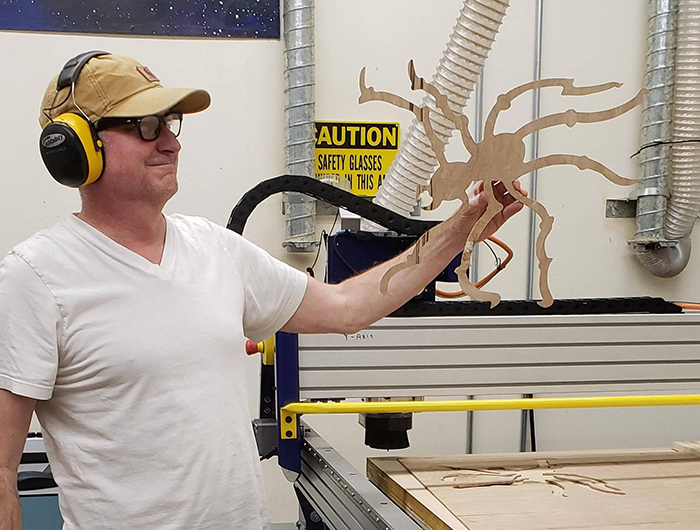
Dave showing off his spider after machining out of .” Luan, using a .” down spiral end mill bit.
For the scaled-down sample of the tree that Steve eventually wanted cut out full size, he imported a .dxf file created using
other CAD software and used VCarve Pro to clean up nodes that were too sharp. Then he used Profile (to the outside)
and a .” bit to cut out the sample.
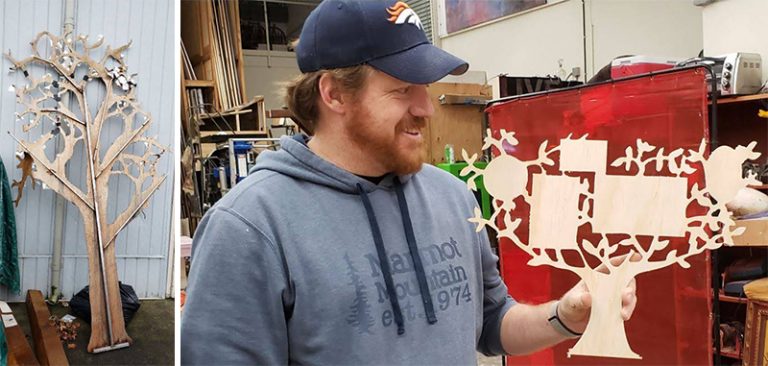
In the art world, the term for a scale model of a full-sized sculpture is “maquette.” The full-size tree will be 120” wide, with areas for projecting on
during the show. Creating a scaled-down sample of the CAD design allowed Steve to test the concept, and to clean up some of the sharp angles
created in the leaves in the original CAD file. Scaling the design up to the full size will be easy, now that the file is in the computer. VCarve Pro has a
tiling function, so a single design file can be spread out among the several sheets of plywood that it will take to create the full-sized set piece.
VCARVING OR ENGRAVING: V BIT
Using a V-shaped bit, the toolpath travels along the centerline of the design. The VCarve Pro software figures out how
deep to plunge the bit in order to get the width that is necessary to carve the design. It is really more of a 3D file, since the
Z depth changes as the width of the design changes. Steve found a Star Wars Aztec Calendar vector file online that
challenged the program, but it machined very well, using the 60V bit included in the ShopBot started bit kit.
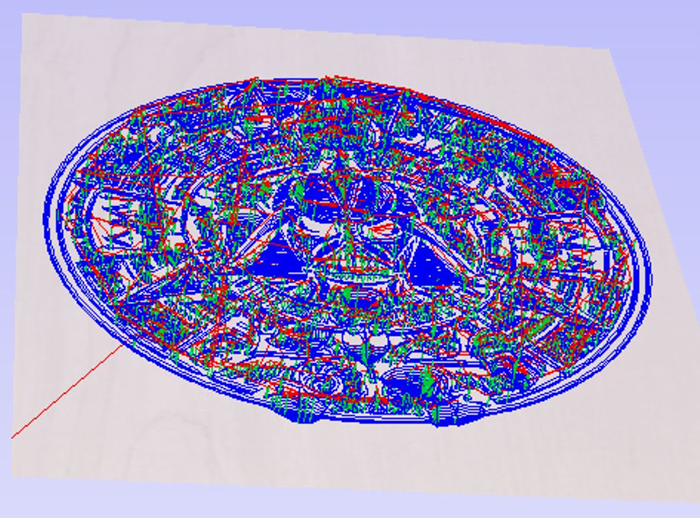
In this isometric view of the toolpath, the blue indicates where the V Bit has plunged deeper into the material to machine away the area between the
design lines.
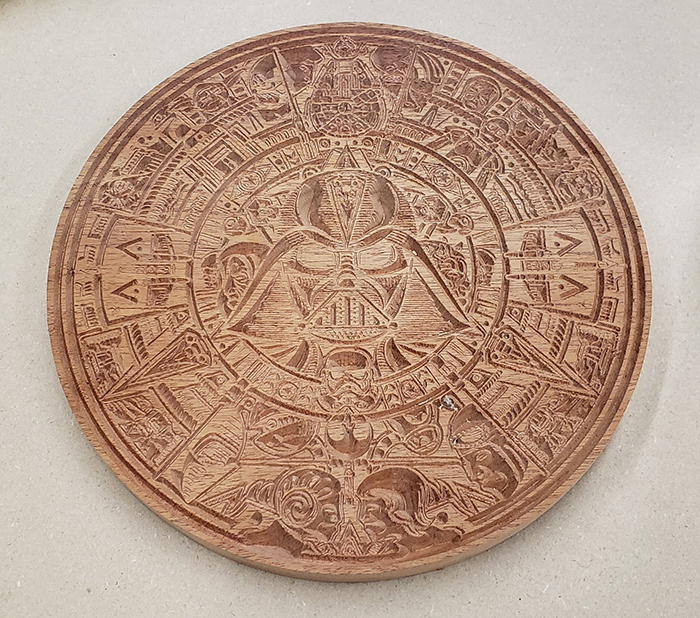
Where there is more space between the two sides of a closed vector, the V Bit plunges deeper. At the corners, the V Bit lifts up and out of the
material, creating nice sharp corners. With all the of detail in this piece, this example took about 1 hr 20 minutes to carve. Then, the circle was cut
out using a profile toolpath and a .” down spiral bit.
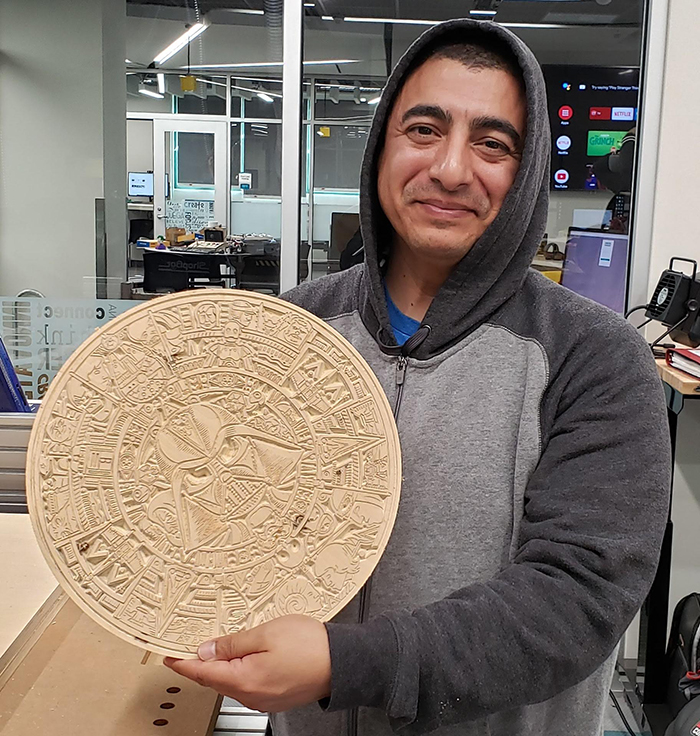
Jerry from Moreno Valley College took a note from Mendocino College, and carved another version of the Star Wars calendar. The results look
different because, in this version, the outer most circle is not selected.
3D CARVING: BALL NOSE BIT
The ShopBot CNC is capable of taking a 3D design file and machining it out of any number of materials in any size up to
the table limits. This means that one can import an .stl, .obj, or other 3D file that may have been created for 3D printing,
do a roughing pass (if necessary) to clear out the big parts, then do a finish pass with a ball nose bit to create the final 3D
carve. While VCarve Pro does not support 3D CAD design, it does create 3D toolpaths (CAM) created in other software
such as Fusion 360 or Solidworks. VCarve’s big sister, Aspire, does support 3D CAD using tools that are more suited to
artists than engineers. One feature that it has is to create a 3D component from a photograph. To test this out, Steve and
Dave posed for a photo on a smart phone, then imported the photo into Aspire to convert into a 3D component. After
gluing up 3 layers of 1” pink insulation foam, Steve used a 1/8” ball nose bit to carve out the results.
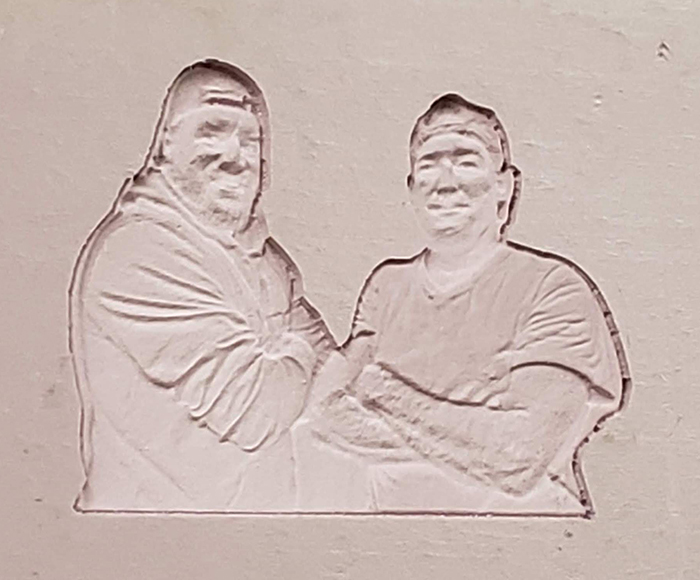
The 3D carving file created with Aspire was pretty impressive for a quick snap on a smart phone, then converting it into a 3D component. The file
was carved in foam using a 1/8” ball nose bit. Using Aspire to create an underlying base, then using the 3D rendering to add details and texture
could create more realistic results. An example of this technique can be seen in the blog post about a Master Class at a USITT regional
meeting.
Students who take part in the theatre program at Mendocino College have the opportunity to practice set and prop design,
sound and lighting, and costuming. The college puts on at least one play each year, alternating between musicals and
dramas. The spring production will be Shakespeare’s “A Midsummer Night’s Dream” (hence the 120” wide tree.) The
professional theatre is also available for outside productions, such as the dance company that put on the “Nutcracker.”
After attending Mendocino College for two years, students can transfer their credits to a four-year program. Steve also
intends to open up the production shop and create courses for students who wish to acquire CAD/CAM, CNC, and
building skills for use in other professions and jobs.
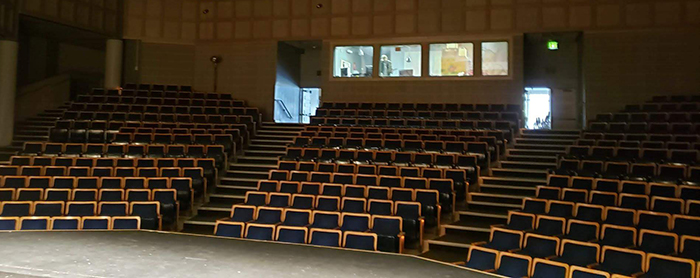
View from the stage of the theatre at Mendocino College in Ukiah, CA. Under Faculty supervision, students run the sound and light boards, build sets
and props, and create costumes.
Toll Free: 1-888-680-4466
Phone: 919-680-4800
Fax: 919-680-4900
ShopBot Tools, Inc.
3333-B Industrial Drive
Durham, NC 27704
USA
Office Hours
Monday–Friday: 9am–5pm EST
After Hours Tech Support
Monday–Friday: 5pm–9pm EST
Saturday–Sunday: 10am–5pm EST
Office Closure
ShopBot Tools, Inc. is closed New Year’s Day, Memorial Day, July 4th, Labor Day,
Thanksgiving Day and the following Friday, and Christmas Eve and Christmas Day.
Outside of normal office hours, we regularly check for support requests,
email and phone messages. To make sure we can get back to you as soon as possible,
leave a phone number or return email address where you will be available.